British capture of Tobruk facts for kids
Quick facts for kids British capture of Tobruk |
|||||||
|---|---|---|---|---|---|---|---|
| Part of the Western Desert Campaign of the Second World War | |||||||
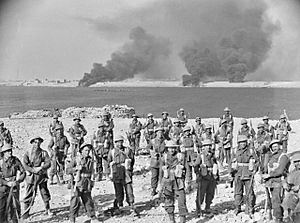 Men of the Australian 2/11th Battalion, 6th Australian Division after the capture of Tobruk |
|||||||
|
|||||||
| Belligerents | |||||||
| Commanders and leaders | |||||||
| Strength | |||||||
| 22,000 troops | |||||||
| Casualties and losses | |||||||
| 3,048 killed or wounded 20,000 POW 1 cruiser scuttled |
400 killed or wounded | ||||||
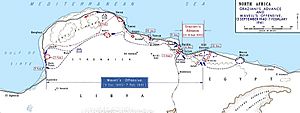
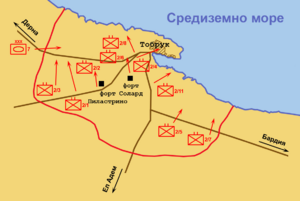
The British capture of Tobruk was a battle fought between 21 and 22 January 1941, as part of Operation Compass, the first offensive of the Western Desert Force (WDF) in the Western Desert Campaign of the Second World War. After defeating the Italians in the Battle of Bardia (3–5 January 1941), the 6th Australian Division and the 7th Armoured Division pressed on and made contact with the Italian garrison in Tobruk on 6 January.
The Italians had fortified Tobruk, their only naval base in Eastern Cyrenaica, before the war but after being routed at the Attack on Nibeiwa, the Battle of Sidi Barrani and the Battle of Bardia the Italian 10th Army had lost eight of its nine divisions and had only the 61st Infantry Division "Sirte" and stragglers to defend the port.
The Tobruk garrison suffered 2,048 casualties and 20,000 men were taken prisoner for 400 Australian and British casualties. The WDF continued its westwards advance towards Derna and Mechili.
Contents
Background
Operation Compass
In September 1940 the Italian invasion of Egypt had begun but stopped after 100 km (62 mi) at Sidi Barrani where the Italians dug in. At first the British prepared to resist an Italian advance on Mersa Matruh but when this did not occur a raid by the Western Desert Force, with the possibility of exploiting success, was planned on the Italian positions around Sidi Barrani. The raid, Operation Compass, began on 9 December 1940 with the surprise Attack on Nibeiwa where the Italian brigade-sized Maletti Group, the only Italian armoured formation in Egypt, was annihilated. On 10 December the Western Desert Force engaged the three divisions of the Italian Libyan Divisions Group and the 64th Infantry Division "Catanzaro" at the Battle of Sidi Barrani and defeated them by 11 December.
With the 63rd Infantry Division "Cirene", the last Italian division on Egyptian soil, retreating towards Libya, the 7th Armoured Division pressed on and by 15 December had cut the road between Bardia and Tobruk. At Bardia the Italians had concentrated the XXIII Corps (General Annibale Bergonzoli) comprising the 1st CC.NN. Division "23 Marzo", 2nd CC.NN. Division "28 Ottobre", 62nd Infantry Division "Marmarica" and the 63rd Infantry Division "Cirene". Further units were four light tank battalions, remnants of the "Catanzaro" division, and the XXI Corps Artillery Regiment. After careful preparation the British attacked and defeated the Italian defenders from 3 to 5 January 1941.
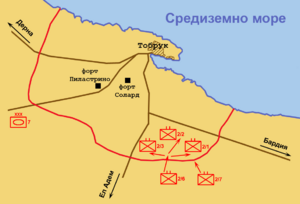
On the morning of 5 January, while Australian forces were still mopping up the southern cauldron at Bardia, Wavell ordered the 7th Armoured Brigade of the 7th Armoured Division to advance west, pass Tobruk and cut it off. By 6 January the brigade had reached El Adem (now Tobruk Airport). By 7 January the bulk of the British forces had arrived and cut off Tobruk. The 19th Australian Brigade group placed itself opposite the eastern defences of Tobruk and the 16th Australian Brigade group took over on the western side. The 4th Armoured Brigade moved to the west of the city, the 7th Support Group blocked the western exits and the 7th Armoured Brigade screened the force from interference from the west.
Prelude
Italian preparations
After the encirclement of Tobruk, Graziani informed Mussolini that
This morning the investment of the position by enemy armoured vehicles has begun. After which the various episodes of the new drama are easily predictable. (Stamani si è iniziato l'investimento della Piazza da parte dei mezzi corazzati nemici. Dopo di che i vari episodi del nuovo dramma sono facilmente prevedibili.)
Graziani informed Mussolini that the 54 km (34 mi)-long Tobruk perimeter was manned by only 22,000 men with 340 guns, a number wholly inadequate for the task. On 9 January, Graziani informed the garrison commander, General Enrico Pitassi Mannella, that there would be no attempt at relief. Graziani ordered Tellera to fall back with the 60th Infantry Division "Sabratha", his last division, to a line between Derna and Berta, while directing the Babini Group (Special Armoured Brigade) to Mechili. After being informed by Graziani that he was on his own Mannella had the bridge at Sidi Daud on the Bardia road and the bridge at Wadi es Sahel on the Derna road destroyed.
Order of battle
Tobruk garrison Details taken from Montanari (1990) unless specified.
- XXII Corps headquarters (Enrico Pitassi Mannella)
- 61st Infantry Division "Sirte"
- 69th Infantry Regiment (3 × battalions, 1 × battery with 65/17 mod. 13 mountain guns)
- 70th Infantry Regiment (3 × battalions, 1 × battery with 65/17 mod. 13 mountain guns)
- 43rd Artillery Regiment, 2 × groups with 75/27 mod. 06 field guns, 1 × group with 100/17 mod. 1914 howitzers
- LXI Machine Gun Battalion
- LXI Mixed Engineer Battalion
- LXI Replacements Battalion
- 51st Bersaglieri Motorcycle Company
- 61st Anti-Tank Company, with 47/32 mod. 1935 anti-tank guns
- 61st Mortar Company, with 81 mm mortars
- 4th Tank Infantry Regiment
- I Medium Tank Battalion, with M11/39 tanks
- LXIII Light Tank Battalion, with L3/35 tankettes
- 10th Army Corps Artillery Regiment
- 22nd Army Corps Artillery Regiment
- 25th Army Corps Artillery Regiment
- Blackshirt Battalion "Volontari della Libia" (Libyan Volunteers)
- CXL Blackshirt Battalion
- 22nd Bersaglieri Motorcycle Company
- 25th Anti-Tank Company, 47/32 mod. 1935 anti-tank guns
- 141st Mortar Company, with 81 mm mortars
- 142nd Mortar Company, with 81 mm mortars
- 55th Signal Company
- Royal Italian Navy:
- San Giorgio (cruiser)
- Guardia alla Frontiera
- Infantry: 2,300 men
- Artillery: 2 × groups
- Service, quartermasters and supply units
- 61st Infantry Division "Sirte"
Although Pitassi Mannella had thirty-two L3/35 tankettes and thirty-nine M11/39 tanks, only seven of the latter were operational and in three weeks of attempts to repair the M11/39s only three were serviceable enough to move in an engagement. After it had become obvious in the autumn of 1940 that the L3/35 was obsolete and the M11/39 badly designed and prone to break down, the XXI Light Tank Battalion and part of the I Medium Tank Battalion had departed for Benghazi to be re-equipped with the new M13/40 tank. Pitassi Mannella had received no spares or fuel for the tanks and had the lightly armed and thinly armoured L3/35 and the M11/39s buried in the sand as strong points.
Fortifications
Pitassi Mannella divided the defensive perimeter in two sectors, five sub-sectors and 16 strong points.
- Eastern Sector (Brigadier Umberto Barberis)
- Sub-sector A, from the sea to Bir Junes to block the road from Bardia, with four strong points
- Sub-sector B, to block the road from El Adem, with two strong points
The first line of the Eastern Sector was manned by the troops of the Guardia alla Frontiera reinforced with four companies from the 69th Infantry Regiment. Expecting the main attack from this direction, Pitassi Mannella established a second line of defence 4–6 km (2–4 mi) behind the strong points, based on a small hill at the junction of the El Adem and Bardia roads. At the second line under command of the 4th Tank Infantry Regiment, every available tank was dug in as a strong point. Between this position and the sea the III Battalion, 69th Regiment dug in.
- Western Sector (Brigadier Vincenzo dalla Mura)
- Sub-sector A, in the desert to the South of Tobruk with four strong points
- Sub-sector B, to block the road from Acroma, with three strong points
- Sub-sector C, to block the road from Derna, with three strong points
Sub-sectors A and B were defended by a battalion each from the 70th Infantry Regiment, while Blackshirt Battalion "Volontari della Libia" (Libyan Volunteers) manned sub-sector C. Behind the first line of defence were five strong points manned by the III Battalion, 70th Infantry Regiment which doubled as the reserve unit for the three battalions in the first line. The commander of the 69th Infantry Regiment received the reserves Pitassi Mannella could muster, an understrength tank company with seven M11/39s and two ad hoc formations, consisting of one Bersaglieri Motorcycle company, one infantry company, one machine gun platoon, an anti-tank platoon and an anti-aircraft section each. In front of the strong points 18 km (11 mi) of anti-tank ditch was cleared out, 7,000 tripwire mines and 16,000 pressure mines laid. To make up for the lack of anti-tank mines Pitassi Mannella had 2,200 12 kg (26 lb) bombs and 800 15 kg (33 lb) bombs, left behind by the Regia Aeronautica (Royal Italian Air Force), buried upright in the desert, in the hope that a British tank passing over them would trigger the impact fuze.
Artillery
Pitassi Mannella organised the artillery into three groups, two for the Eastern Sector with 123 guns and one for the Western Sector with 97. Assuming (correctly) that the Commonwealth troops would attack from the south, Pitassi Mannella sent the II/43rd and III/55th groups with 75/27 mod. 11 field guns, and the CV/25th and CXXX/25th groups with 149/13 mod. 14 heavy field howitzers and the 2nd Battery of the XV Group with 75/46 mod. 34 anti-aircraft guns (used as anti-tank guns) into that area. For long-range artillery-fire, Pitassi Mannella relied on the cruiser San Giorgio in Tobruk harbour which had two twin 254 mm (10.0 in)/45 guns and four twin 190 mm (7.5 in)/45 guns. Two Regia Marina (Royal Italian Navy) shore batteries had twin 120 mm (4.7 in)/40 naval guns and two mobile 149/35 heavy guns of the Guardia alla Frontiera.
With no air reconnaissance, Pitassi Mannella was unaware of the British artillery positions and as most British artillery had a longer range than the Italian artillery, mostly of First World War-vintage there, was little chance of effective counter-battery fire. Pitassi Mannella decided to employ every gun capable of direct fire as anti-tank artillery and managed to assemble 110 anti-tank guns; thirty-two 37 mm guns in the buried M11/39s, forty-three 47/32 mod. 1935 anti-tank guns, thirteen 65/17 mod. 13 mountain guns, eleven 75/27 mod. 11 field guns, ten 77/28 mod. 5 field guns and one 76/40 mod. 16 naval gun (found in the naval stores); armour-piercing ammunition was available only for the 37 mm and 47 mm anti-tank guns.
British preparations
After surrounding Tobruk, the WDF had exhausted the ample Italian supplies captured at Capuzzo and Sollum; O'Connor directed that the supplies flowing through the port of Sollum (350 long tons (356 t) per day in early January and 500 long tons (508 t) daily late in the month) to the 10th and 11th Field Depots he had set up about 70 km (43 mi) east of Tobruk. Concerned mostly about not having enough fuel and supplies for the offensive after the fall of Tobruk, O'Connor delayed the attack to accumulate more supplies. As the 7th Armoured Division had suffered more losses than the 6th Australian Division, O'Connor decided that the Australians would lead the attack. The two most depleted units, the 8th King's Royal Irish Hussars and the 6th Royal Tank Regiment, were withdrawn and their equipment distributed to the other four regiments of the armoured brigades. The first wave of the attack was to be the 16th Australian Brigade and the 7th Royal Tank Regiment, followed by the 17th Australian Brigade and the 19th Australian Brigade. The 7th Armoured Division would attack along the Western and perimeter to pin down the defenders. On 19 January the Royal Air Force (RAF) dropped leaflets calling on the Italians to surrender but Pitassi Mannella took no notice.
Attack
Night 20/21 January
From midnight to 2:00 a.m. on 21 January the Royal Navy monitor HMS Terror and three smaller ships bombarded Tobruk, while destroyers waited further out to attack San Giorgio, if the crew tried to escape. For the rest of the night RAF Wellington bombers attacked port installations, defensive positions and drowned out the sound of the British tanks assembling for the attack.
Morning
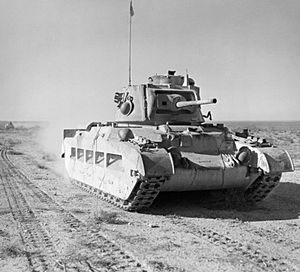
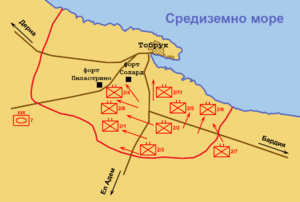
At 5:40 a.m. the British artillery opened fire along the entire line, concentrating on an area about 2,187 yd (2,000 m) by 766–875 yd (700–800 m) rectangle where the sub-sectors A and B of the Eastern Sector met. Under cover of night Australian sappers and the British artillery-fire cleared a path through the thin Italian minefield in the area and at first light the 2/3rd Australian Battalion attacked. Within the hour the Australians had created a breach 1 mi (2 km) wide. At 7:00 a.m., 18 Matilda II tanks passed through the breach, three of which veered left with the 2/3rd Australian Battalion, while another three veered right with the 2/1st Australian Battalion to expand the breach. At the same time, the rest of the Matildas advanced with the 2/2nd Australian Battalion towards Tobruk. The first unit to be overrun by the 2/2nd was the CV/25th Artillery Group, which had no time to lay their guns for direct fire before they were overrun.
The lack of radios of the Italian units proved to be a severe disadvantage; telephone lines had been cut by the British aerial and artillery bombardment and Pitassi Mannella only received notice of the British attack at around 8:30–8:45 a.m. from a despatch rider. By 9:10 a.m. the Australian 2/2nd Battalion had reach Sidi Mahmud and the 2/1st Battalion was at Sidi Daud; the 17th Australian Brigade with the 2/6th Australian Battalion and 2/7th Australian Battalion had captured the Italian artillery positions between the two points. By 10:30 a.m. the Australians had overrun four of the Italian strongpoints and destroyed six of the ten artillery groups in the area. At 8:30 a.m. the 19th Australian Brigade supported by A Squadron of the 6th Australian Division Cavalry Regiment had set off and towards the 4th Tank Infantry Regiment. The Australian brigade was supported by 78 field guns, which moved in turns 200 m (219 yd) forward every two minutes. The 19th Australian Brigade struck the III Battalion, 69th Infantry Regiment, which was quickly overrun. A Bersaglieri company and three M11/39 tanks that tried to plug the gap in the second line were defeated within minutes, the three M11/39s being knocked out.
Air power
By 11:50 a.m. Pitassi Mannella had informed Graziani that the Eastern Sector had been destroyed and only isolated positions held out. All Graziani could do was to send three CR.30 fighters to Tobruk, which the RAF quickly shot down. Between 12:00 p.m. and 2:00 p.m. the 19th Australian Brigade attacked the position of the 4th Tank Infantry Regiment with such ferocity that 70 per cent of the officers, including both battalion commanders, and 50 per cent of the troops were killed in action. During the day, Blenheims of 55 and 113 squadrons flew 56 sorties against Tobruk and the Gloster Gladiators and Hawker Hurricanes of No. 3 Squadron RAAF, No. 73 Squadron RAF and No. 274 Squadron RAF had patrolled to the west.
Afternoon
At 1:00 p.m., Pitassi Mannella ordered the mobile reserve, with the seven operational M11/39s, to attack the Australian left flank from behind an artillery barrage. Two Australian anti-tank guns and two tanks destroyed five of the seven M11/39s and when Australian infantry pushed forward the mobile reserve surrendered. At 4:00 p.m. the 2/8th Australian Battalion attacked the Pilastrino position, while the 2/4th Australian Battalion had reached and surrounded the Italian headquarters at the abandoned Fort Solaro. Pitassi Mannella and his staff retreated into the cellars but by 6:30 p.m. Pitassi Mannella ordered his staff to surrender. At the same time the 6th Divisional Cavalry Regiment had reached the outskirts of Tobruk but then been stopped by fire from San Giorgio. Soldiers from the 2/4th Australian Battalion moved down the cliffs and used 3-inch mortars against San Giorgio. Having lost contact with forces outside of Tobruk, Admiral Massimiliano Vietina organised the defence of the harbour with the few men at his disposal. Graziani had denied his request to make a sacrificial attack on the Royal Navy ships outside the harbour and Vietina began systematically to destroy the harbour and its stores.
22 January
By nightfall half of the Tobruk fortified area had been captured and at 4:15 a.m. on 22 January, Vietina ordered Captain Stefano Pugliese to blow up the magazines of San Giorgio to deny it to the British. General Iven Mackay ordered a general advance for the morning of 22 January. At 8:30 a.m. Vietina surrendered to General Horace Robertson of the 19th Australian Infantry Brigade, followed shortly afterwards by General Della Mura, who surrendered with the remnants of the Pilastrino position. At 4:00 p.m. the last strongpoint surrendered and Tobruk had fallen.
Aftermath
Casualties
The Italians suffered more than 24,000 casualties, 18 officers and 750 soldiers had been killed, 30 officers and 2,250 men had been wounded and more than 20,000 men had become prisoners of war. The British captured 208 guns and 87 tanks. XIII Corps (the new name of the WDF) suffered 400 casualties, 355 of them Australian.
Subsequent operations
By the surrender O'Connor's divisions had already pressed on, the 7th Armoured Division reaching Mechili and fighting the action at Mechili on 24 January, while the 6th Australian Division had reached the Italian forward positions at Derna on the same day.
See also
- List of Italian military equipment in World War II
- List of Australian military equipment of World War II
- List of British military equipment of World War II


